

The first piano lesson of the year is a great time to do something different with your students.
And I don’t mean just choosing a new piece of music. I mean scrapping the music altogether and getting off the page.
It’s easier to do than you might think and kids love it.
Want to know exactly how to do this with your students this year?
This is the article for you.
Note: See videos, lesson plans, app and downloads below.
My favourite activity for the start of the year (even if you’ve introduced it before or already had a few lessons with a student) is to explore the 12 bar blues.
The 12 bar blues is simply a chord progression consisting of the 1, 4 and 5 chords in whatever major key you’re working. The 12 bar blues is found in all sorts of music across all genres and is a form and style of music that all musicians should be 100% familiar with.
I tell my students that if they ever want to play in a band in the future, they better know the 12 bar blues (especially in E) as that’s one of THE most common things that a group of musicians will jam along to when they first get together. Why? Because everyone understands the form, it’s easy to play on just about any instrument, it sounds good and it’s fun!!

Remember too that every student will learn 12 bar blues reading pieces in their method books and probably many more over their lifetime of study. If they can understand the concepts of the structure, chords and improvising before ever reading the music, they will have a much better comprehension of the form when it’s time to read.
The most fun thing about the blues is that it’s a musical structure that’s really easy to improvise over if you know a couple of tricks (which I’ll share below). Students can quickly get lost in the magic of making up their own music while you can sit back and enjoy their journey into jazz.
Ready to get started?
I teach the blues in two ways:
Depending on the student’s ability, in one 30 minute lesson, you’ll probably be able to teach both the chords and the improv so the student can go home and explore both.
Let’s take a look at how to teach the chord progression first.
So what do I mean by 1, 4 and 5 chords?
Let’s look at an example in the key of C major. The notes of the C Major scale could be numbered:
So the chords built on “1, 4 and 5” are:
Note that at this stage, I don’t worry about teaching the students about the construction of chords or anything (that comes later). I just want to get them playing.
Now to create the 12 bar blues form, we just play these chords in the following order (I write this down for the student’s reference):

I encourage students to use fingers 1-3-5 to play triads in their RH, however if this is not comfortable, I’ll let them use 1-2-4 or even 1-2-3. Offer the student suggestions as to alternatives and ask them what feels the best.

Remember, this is a fun, creative activity designed to get the students exploring and making music as quickly as possible. While you might really want to fix issues with fingering now, I’d recommend leaving this for later and prioritising the music-making.
If your student isn’t able to play a 3-note triad in the RH, then just get them to play the 1st and middle note (eg. CE of a CEG triad) with fingers 1 and 3.
Like with any chord-based playing, just playing these chords like that will sound pretty rubbish.
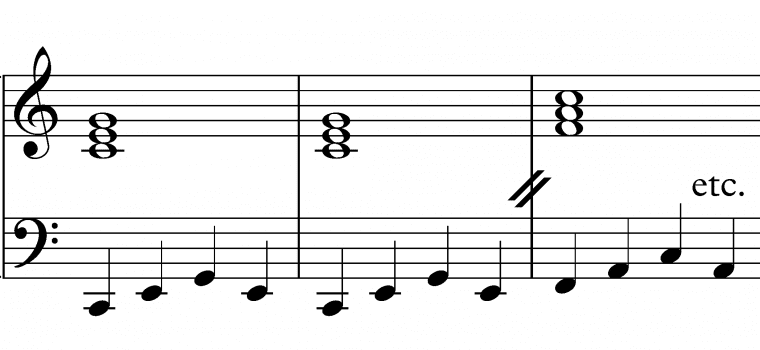
A simple way to add interest to the chord progression and make it sound more jazzy is to get the student to play a simple broken chord pattern in their LH instead of holding the bass note.
If they play a C major triad down low on the piano, it will sound muddy, however if students break up the notes of the chord, it will sound like a simple walking bass.
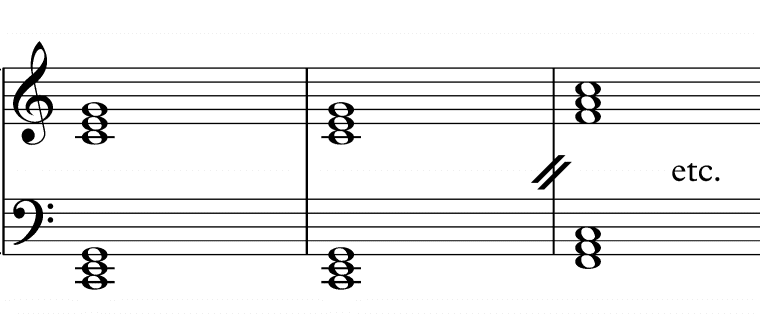
In order to get in the right hand positions, get the students to play the progression with just chords in both hands:
When they can do that easily, it’s time to break-up the LH chords to form a simple “walking bass”:
Watch as I demonstrate how easy it is to try this with your students:
Now that they can play the chord progression, it’s time to add some groove. The best way to do this is with a brilliant app that works on all devices (iPad, Samsung, iPhone, tablets, phones, etc.) called iReal Pro (click that link to download if you’re on your device).
This is a paid app which is well worth the expense. I use it daily with most of my students.
Related: Best iPad apps for Piano Teachers
While you don’t have to use a backing track to teach the blues, I strongly encourage it as it really does bring the music and the experience to life for students. Jazz is, after all, predominantly a group performance style.
While you might be able to find a CD with a backing track that’s suitable, this app is far more functional as you can easily change the groove/style, key and tempo with a click of a button.

To make things really easy for you, I’ve put together a few downloads that will help get you started (just click to open – yours free!):
Whether or not you use my iReal Pro chart (trust me, it will save you the time of learning how to create these from scratch), here’s how the chord chart should look when you’re ready to play:
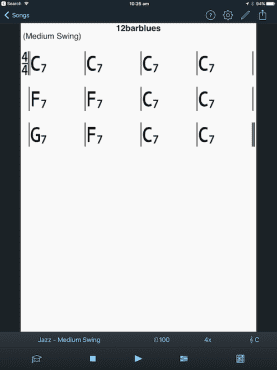
Notice down the bottom that you can choose the style (currently: Jazz – Medium Swing), the tempo (currently 100), the number of repeats (4) and the key (C Major).

Press play and get your student to play along with the backing track created by iReal Pro. They’ll feel like they are in a jazz band and I guarantee they’ll love it. Change the speed to match how fast they can change chords.
If you’ve got multiple pianos, you can play along too, or perhaps improvise to demonstrate what the student will be learning next.
NOTE: I encourage all teachers to invest in some external speakers for their studio as the iPad speaker is not designed for volume – especially if you have one or more pianos playing along. You can see what I use on my resources page.
Improvising over this chord progression is dead easy.
All you need to know is the C Blues Scale:

I like to stick to the standard C Chromatic Scale fingering of just 1 and 3 (thumb on white, 3 on black). If the student has already learnt the chromatic scale, this will be relatively easy. If they haven’t, then it may take a little more work.
Again, don’t get hung up on fingering. If it’s a bit of a mess, don’t worry. The jazz greats of the past won’t turn in their graves (they’ll probably be impressed!).
When the student plays a ‘wrong’ note (it’s bound to happen), tell them how cool it sounded and not to worry. Most jazz musicians will tell you there are no wrong notes in jazz (just some that sound better than others).
Watch me demonstrate Lesson 2 in this video:
A good way to practice this scale is to start the backing track and play the notes of the blues scale up and down over two octaves in time with the pulse. Depending on the skill of the student, this could be a new note of the scale every crotchet beat or every minim.
When the student is relatively comfortable doing that, then explain to the student that they don’t have to play all the notes in order. They can stop and start, repeat just a couple of notes (or even 1 note!), skip a note and they can break out of the steady rhythm (as long as they are still feeling the groove).
Hey Presto: they are improvising! 
Students will tend to stick to the middle of the piano when they start improvising so, while the backing track is playing and you’re playing the chords on a second piano (or down low on their piano), ask them to try improvising up an octave or two higher.
What does it sound like? Does it give more separation from the chords? What do they prefer?
Make sure you’re encouraging them to listen by asking them questions like this.
Now that the student can play the chord progression and play the improvisation, it’s time to put a mini ensemble together with you, the backing track and your student.

If you have two pianos in your studio, then get on your other piano (or just share one piano like a duet) and explain the format:
Start the backing track in iReal Pro and start grooving.
Give them lots of encouragement as they improvise.
Help them to listen for patterns or “licks” as jazz musicians would call them – ie. melodic fragments that sound good and that they can repeat and build upon. I talk about this more in Lesson 4.
Now that your student knows the basics of playing the blues, get them to keep exploring it at home. Here are suggestions:
Do you like having written instructions when you teach something for the first time?
I do!
To help get you started, I’ve created two lesson plans for using this activity in lessons. It will be the perfect reference that you can use while you teach.
Lesson 1 and 2 can normally be completed as part of one 30 minute lesson, however this may change depending on your student’s age and ability.
Scroll down below to get your full FREE download of Lessons 1 and 2 of Teaching the 12 Bar Blues Course.
The above videos and lesson plans come from modules 1 and 2 of my 10-part course on Teaching the Blues, which is available free to Studio and Evolution Members of TopMusicPro.
As well as the two lessons you’ve experienced, the next course modules include:
You can get access to this course today by taking 10% off a monthly or annual membership using the coupon code ILOVEBLUES at checkout.
Whether you’re on a monthly or annual subscription, you’ll get access to this course and hundreds of other creative piano teaching resources, webinars, monthly masterminds, our community forums and much more.
Click below and I’ll see you inside the community.


Martin Corke says:
I am a 79 year old student not a teacher, though I do help the early starters with piano as a volunteer at my local school. I decided I wanted to learn more about blues when I taught myself to play “Blues for Wynton Masalis” and have been using the 4 chords you describe for other music. My question is would this course as a student be suitable for me.
Tim Topham says:
Hi Martin. Yes, we have adult students accessing our membership for the courses and teaching themselves, so while the content is directed at piano teachers, anyone with a base level of knowledge will be able to make great progress!
Elizabeth says:
Hi Tim, My student absolutely loved learning the blues scale and when I played the backing track with the blues scale for him it was off the charts. He was literally jumping up and down and dancing! This was near the end of a lesson that had some struggling going on with not wanting (or liking) to play the songs assigned. Just seeing him so happy was a joy! I am having a problem sending the backing track link to them. The one link works for me but doesn’t work for them. I tried sending another of the links you gave, but that didn’t work for them either. Maybe there is something wrong with the way I am sending it? I tried copying and pasting the links you gave. I know he can’t wait to get it, so I will keep trying to find a way to get it to him. Thank you.
Tim Topham says:
Wow, that’s so great Elizabeth – thanks for sharing! Re the backing track, just look for the link above that says: “A WAV file of the backing track that you and your students can use without needing any apps”. When you click that, it will open a new window and play.
Just send your student to this page and get them to click on the same link – simplest way to get it shared.
Elizabeth says:
Thank you, Tim! You are awesome!
Mark valdez says:
Terrific advice on learning blues improvisation. Thanks
Tim Topham says:
Thanks Mark!
Emma says:
Hi,
Is the full course available for purchase without joining the community?
Thanks!
Emma
Tim Topham says:
Hi Emma – sorry, no. All my courses come as a part of my membership. PLUS you get ongoing support and access to me and the entire community and expert teachers. Trust me, it’s a much better way for me to support you teaching in new ways 🙂 I hope to see you inside soon!
Elaine Fonseka says:
Hello Tim, Thank you for these videos and lesson notes! They are really helpful to my learning and give my great ideas on how to improve my own lesson notes. I have tried to learn the 12 Bar Blues from other online teachers and other videos, but I find your teaching to the point and easy to understand and use.
God bless you for your kind sharing.
Tim Topham says:
Thanks for your kind comments, Elaine 🙂 Glad the videos and plans are helpful!
Betsy says:
Nice videos! I’ve been looking on this site, though, but don’t find the download links for the first two lesson plans. (Nor can I see the two comments that have already been left–I just get a spinning circle.) What have I missed??
Tim Topham says:
HI tibiscribo. This is likely an issue with your browser. The form to grab the lesson plans is just before the title “Next Steps”. If it’s not showing, please restart your computer, clear your browser cache and history and/or try a different broswer or device. It’s all there 🙂
Elizabeth R. says:
I love Tim Topham! He is such an inspiration on so many levels. I just wish I had more time in my day to listen and read everything he shares. (Oh yeah, he has something for that too! Overwhelm….and better managing of my schedule).
Thank you for this great resource for improvising 12 Bar Blues! And thank you for all you do to help piano teachers! God Bless you.
Tim Topham says:
Awww Thanks Elizabeth – glad you’re finding my resources helpful. Don’t get overwhelmed with all the stuff though 🙂 Just try and few things and come back when you’re ready for more. Best wishes, Tim.