
Teaching beginner piano students technique can be hard, but our four tips will help put you in good stead.
I’ve long been fascinated with the idea of “piano technique” and most notable, the right way of teaching beginner technique.
Piano technique is a really personal thing. You could ask 100 teachers and many will have different views on what’s important, what to do, and how to teach it.
But there are a few approaches common to all the best teachers, and we’re going to break them down.
By the way, while researching this article I enjoyed a book called “A Piano Teacher’s Legacy”
It’s a book about the famed Frances Clark Centre teacher Richard Chronister and, despite being written 20+ years ago, his technique approach aligns beautifully with the viewpoints of today’s top educators.
Table Of Contents
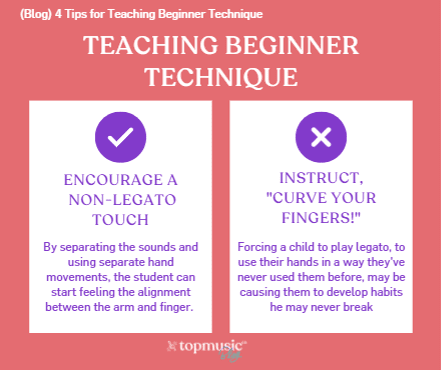
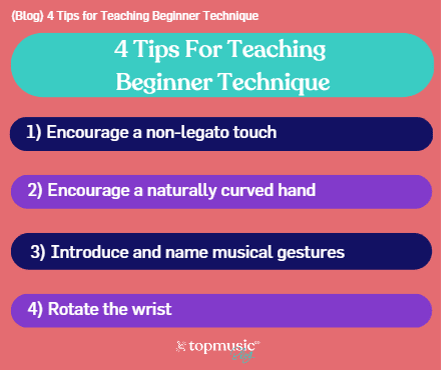
When teaching beginner technique, there’s one thing that all teachers are starting to agree on. You shouldn’t introduce a piano student to legato playing from the very beginning.
Using a non-legato touch is a foundation for building a solid technique for beginners. By separating the sounds and using separate hand movements, the student can start feeling the alignment between the arm and finger. They can begin understanding how everything is working together as one unit.
This is now commonplace in all modern (read: self-published) methods like Piano Safari and Supersonics Piano, to name just two.
RELATED: Tim interviews Julie Knerr and Katie Fisher about Piano Safari’s approach to piano technique
Here’s why Richard Chronister says aiming for legato too soon is problematic:
“When a child takes his first lessons in art, his method of drawing is expected to be primitive, and the result is unmistakable: it looks like a child’s drawing.
When a child takes his first piano lessons, his technique of playing is expected to be a sophisticated legato, and the result is unmistakable: flat fingers, thumbs hanging below the keyboard, fingers flying, no real legato.
The eternal cry is, ‘Curve your fingers!’
Forcing a child to play legato, to use his hands in a way he has never used them before may be causing him to develop habits he may never break.”
It’s great to see that times are changing.
There is now more focus on Rote teaching (including my own No Book Beginner Framework) for beginner students.
They practice technique (and non-legato) movements fluently across the full range of the piano without worrying about reading notes.
And while some methods still advocate ‘unnatural positions’ (both thumbs on Middle C) and legato from lesson one, there are many more innovative approaches.
Methods like Supersonics, Piano Safari, Interactive Piano, and many others tackle this head-on.
Have you ever seen a beginner student play a five-note scale in one of these ways?
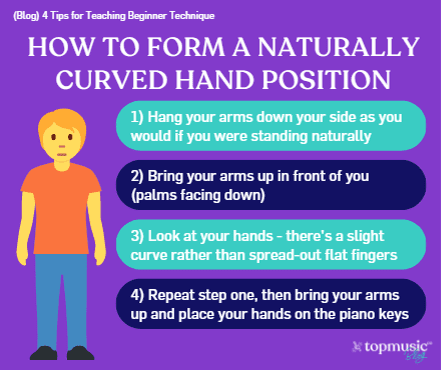
These ways of playing can occur simply because they’re missing a naturally curved hand. This is something they should develop in the initial stages of learning.
100 years ago, it was common for teachers to tell students to “curve your fingers!” Any flatness in the hand was discouraged. Fingers had to be brought in.
And while we agree that we don’t want our students to be playing with flat hands and spread-out fingers, the curve has to be formed naturally.
If we instruct our students to “curve your fingers” tension forms and the hand position is not natural.
One way to form a naturally curved hand position:
Related: Penelope Roskell’s Top Tips For A Healthy Technique
Once we’ve established the naturally curved hand position, we need to strengthen it and cement it in our student’s minds.
One way to do this is an approach advocated by Richard Chronister.
He says that it’s not natural for a child to play a pentascale on white keys with all fingers properly supported and quiet, and with thumbs remaining on the keyboard, from the very outset of lessons.
Sure, this can happen during the lesson, but expecting it to happen at home during daily practice is beyond optimistic.
Instead, try this:
Richard then says, “We do the same thing at each lesson until the student can play the 5-finger cluster without help. We will not ask them to do it at home; we will do it only at the lesson”
This is precisely what Marvin Blickenstaff (an early member of the New School) explained and demonstrated in our upcoming Technique Course and on my podcast.
It was apparently his idea!
Giving names to certain gestures is beneficial for several reasons:
Examples of named musical gestures are “Lion Paw” (from the Piano Safari method) and “Rocket Launch” (from SuperSonics Piano).
Back in my day, these movements were called “drop-float” or “sigh-ing” which were never that memorable or descriptive.
Names like “Lion Paw” and “Rocket Launch” can help a student visualize the action and understand the movement required
Whatever words you use, musical gestures are vital for an ability to shape phrases in the future. Beginners must learn to play with a relaxed wrist but a firm tone. They should lift off notes gently, using the wrist.
Here’s a crucial pathway for gestures:
I was never taught about the wrist having to move when I was first learning piano. This led to some tension in my playing and frustrating and painful movements while preparing an advanced Beethoven sonata for my Diploma.
You can read about my experience here.
Luckily, working with a Taubman specialist teacher really helped me, and taught me all about the Dorothy Taubman approach. Taubman focuses on helping pianists play brilliantly and effortlessly (and to avoid injury).
I think we should be freeing our students to make beautiful phrasing from the very beginning, not just working with advanced students on this.
When students are first learning to move between fifths they should be taught the importance of wrist movement and not keeping it all in the fingers. The knowledge that rotating the wrist enables freedom of expression and ease of playing rapidly is not something that we should be keeping from our beginner students!
A piano technique tip that should go without saying, is to make sure your student is sitting at the right height.
When your student is sitting on the piano stool, follow this checklist:
For more tips on the correct posture for sitting at the piano, check out this video.
You’ve heard about my take on teaching beginner technique, but as I said – all teachers have different opinions on teaching technique.
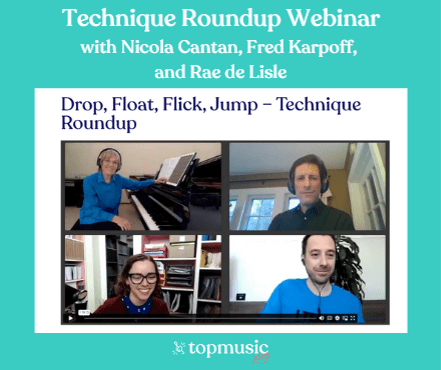
I hosted a webinar with Nicola Cantan, Fred Karpoff, and Rae de Lisle where we discussed all things to do with teaching piano technique to beginner students.
This webinar is available to Lite, Studio, and Evolution members of TopMusicPro.


ted ryden says:
Hi Tim,
Thanks for the good ideas on technique for beginners. I really like the idea of the curved, yet relaxed, hand position.
Ted Ryden – Minnesota, USA
Susan Pope says:
I registered and was ready to listen to webinar on piano technique, but it must have been over! The time conversion table told me it would start at 5 pm not 4 pm as I saw it was supposed to be! Is there a replay of the webinar?! I’m so sorry I missed it! Thanks!
Susan Pope, Director
Ms. Susan’s School of Music
Greenwood, SC USA
Tim Topham says:
Hi Susan – sorry about that. Look out for an email with your replay link 🙂