Back in the day, I learnt a lot about how I wanted to organize my business, even though I didn’t realize it at the time.
I always worked for private schools, which meant that I needed to ensure parents were given information quickly and my students were always learning something. Otherwise, why were parents paying all that money for tuition? It turns out those years teaching in the classroom translated very well to having my own business.
One school I worked for had frameworks for almost everything. Lesson plan outlines, unit plans, annual curriculum plans, annual self-reflection, parent communications … you name it.
As a beginner teacher, I loved the structure and how easy they made it for me to focus on teaching, rather than the paperwork associated with my job. It was this experience that was the guiding force behind many of the frameworks I have in place for my studio today.
However, another school I worked for had the same network access for administration, teachers and students. Combining this with a lab set-up that didn’t allow me to see what students were doing … well, you can imagine how much time was spent keeping junior high students off Facebook when the temptation was always there during computer class.
While I had a greater appreciation for what my college computer science professor went through with us, I promised myself never again. When I introduced lab time programming for my studio, I didn’t want to make the same mistakes they made. I wanted my students set up for success!
P.S. Make sure you read right through to the end where you can grab a free PDF download to help you organize your iPad for teaching success.
Read more about Rosemarie’s travelling piano lab set up: How to Build and Run a Successful Travelling Music Lab
With the plethora of apps available for teachers and studio owners, it can be overwhelming trying to figure out an organizational system that works. Especially when a student is right next to you in lesson and time is of the essence.
How many times have you had to pause a lesson because you were looking for:
We only have a short period of time with our students during the lesson, so let’s not waste that time looking for something. Let’s set up our iPads so our studio is literally right at our fingertips! I can tell you from experience that organizing your iPad will set you and your students up for success throughout the lesson and ensure your parents feel tuition is well spent.
Related: Best iPad Apps for Piano Teachers
As a travelling teacher, anything that I need to find in my office adds to my work hours. It requires making a note of what I need to find, finding it in my office, possibly scanning it, and then sending to my client. No thank you. I would much rather be doing something else. If I am budgeting travel time into my teaching hours, I want to ensure that I am using my office time in as efficient of a manner as possible.
Through trial and error, I have created frameworks for keeping my iPads organized. Some of the types of information that teachers might need to have electronic access to are:
What do you need access to and when?
The best way I have found to divide my iPads is to think about what I will be using it for and creating screens for each of those functions.
My screens are divided into:
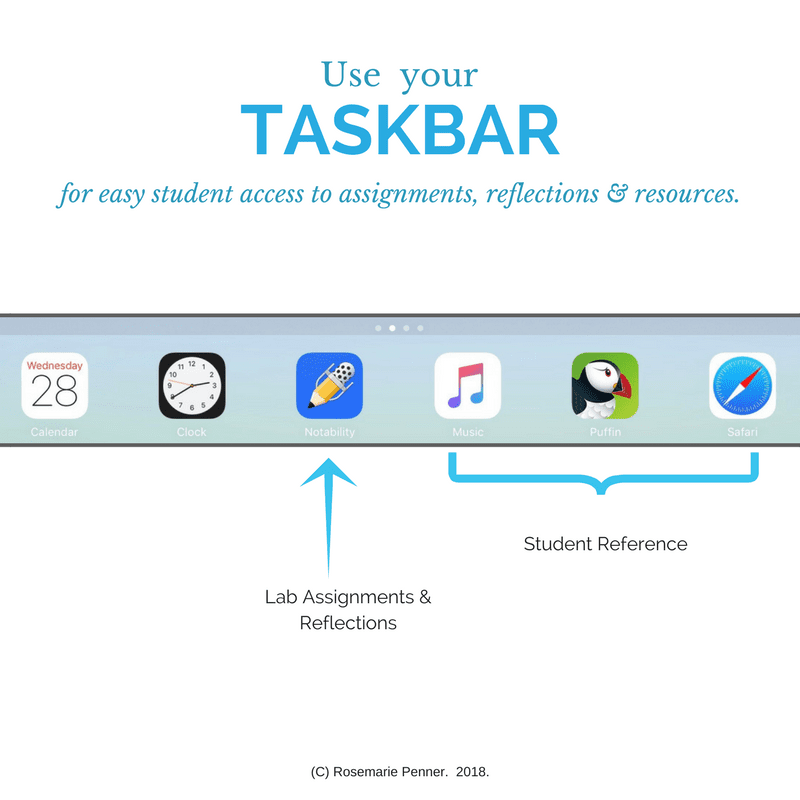
Did you know that you can customize the taskbar at the bottom of your screen? This is where the apps you use the most should be placed.
For my teaching iPad, these include anything I need access to quickly such as client information, lesson plans, and in-lesson help for students.
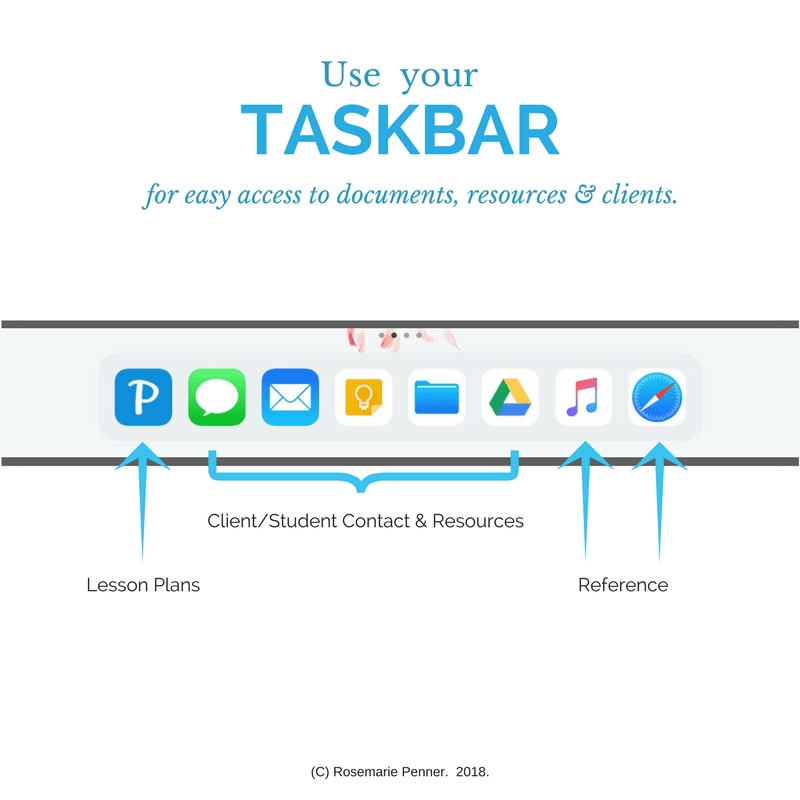
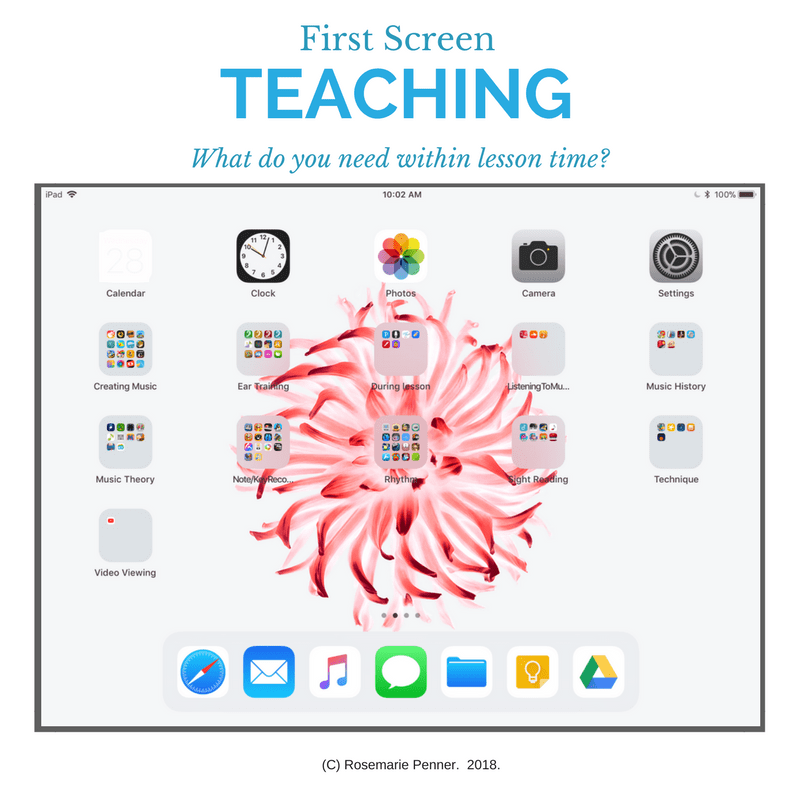
My top line acts a bit like the Taskbar in that these apps are not grouped into folders. These are the apps I want to see at a glance, rather than opening a folder.
However, the rest of this page is divided into different categories. I am a BIG fan of putting things into folders to keep things extra organized. (This shows my age, I know. To this day, there is something about a well-organized file cabinet that just makes me content.) The teaching screen is all about what you need during lesson time.
These folders are based on the ‘categories’ I have throughout lessons. They also happen to be a good reminder when I am lacking lesson time or assignments in any one category.
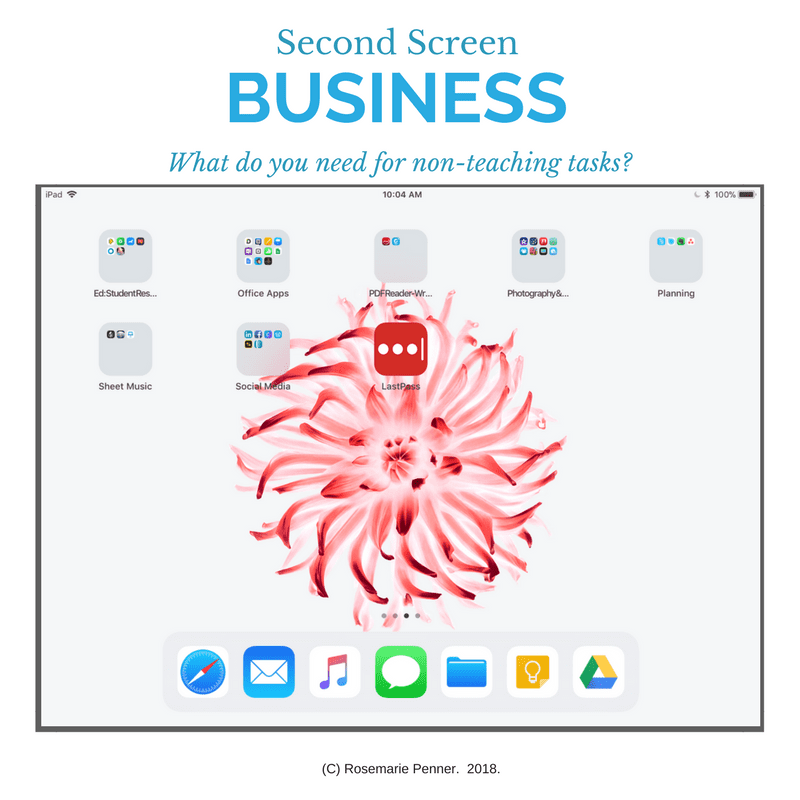
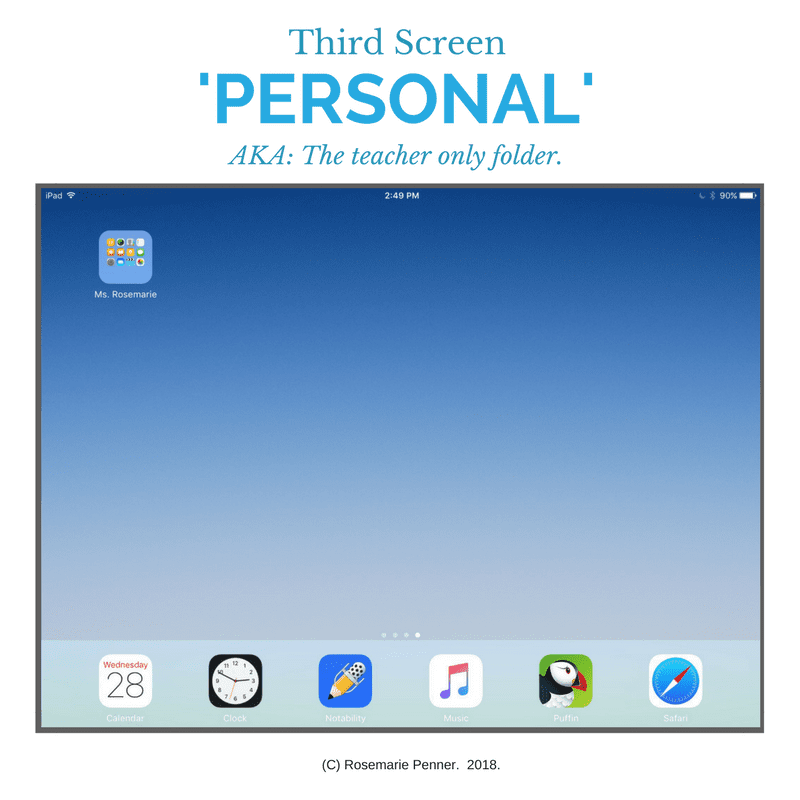
When I want to focus on the business side of my studio, this is the screen I go to. The advantage is that I am not distracted by anything lesson related.
However, you may find that this is the screen that needs the most passwords. For this reason, I keep my Last Pass app by itself on the screen, so I have easy access while I focus on the administrative side of the studio.
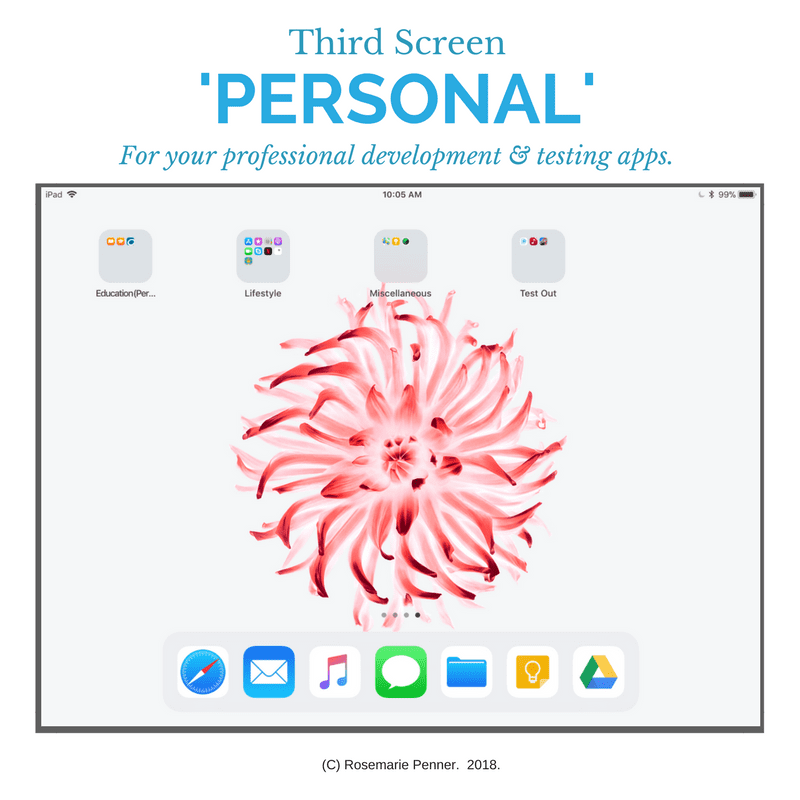
The name of this screen is a bit of a misnomer. It could be entitled the “No, really I’m not working! I’m just testing something out!” screen … but that seemed a bit long.
Since I tend to keep my personal apps on my cell phone, these are the iPad apps that I access during my downtime. For example, a click of a button allows me to update all the apps while I move onto something else. These are also the apps that I am not using during lessons but am testing out for future use or apps that are related to my professional development.
Recommended: How to Import Sheet Music into your iPad
Since I included a lab time component into lessons, it became imperative that I had an iPad strictly for student use. When I set up my student iPad, I wanted to ensure that I could hand-off the iPad and my students could find everything they needed for lab independently. This was especially important for those lessons while teaching one student at the piano while the other was doing lab time independently!
By thinking through how I wanted students to interact with the iPad, I created a framework that lets them easy and quickly find exactly what they are looking for. Some of the types of apps you may want students to have electronic access to are those that:
For the student iPad, I put almost everything on the first page. This keeps students focused on what was assigned during that lesson. My students are great and I trust them. But, they are kids and WILL test limits at some point. Rather than have temptation there for them, I make it easy for them to focus.
My screens are divided into:
The customization for this taskbar is slightly different from my teaching iPad. After all, my students need access to different information and apps within their lab time.
I focus on the apps they need to access right at the start of lab time or those that provide reference information for them.
This page has many similarities to the first page of my teaching iPad. However, the only app that is not included in a folder is the Camera. This allows students to take pictures when necessary without a lot of fuss.
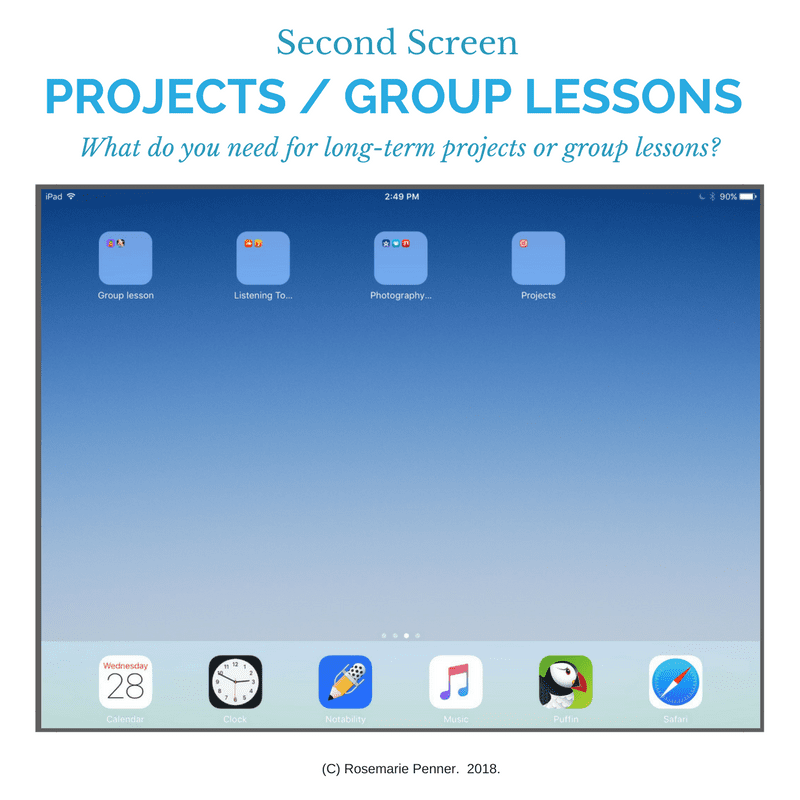
Lessons flow seamlessly from concept to concept. Dividing those concepts into folders makes find them oh-so-easy!

These are the apps I know we will be using in the future for long-term projects or group lessons.
The folders I include on this page are:
The Ms. Rosemarie folder is the folder my students all know they are not allowed to access. These apps are purposely two screens away from where students should be during lab time. Children are naturally curious so I try to organize apps and folders so they are less tempted to access things beyond their assignments.
The types of apps in this folder are:
Our studios are private schools.
We have a responsibility to have frameworks in place that ensure parents and students have easy, quick access to the information they request. There should be a purpose for every activity … whether at the piano, using tech, or activities away from the bench.
By organizing your iPads, you can streamline the information and processes that take place during lessons. Never again will you be stuck looking through the iPad in vain while a parent or student looks on … only to let them know you will get the information to them later. Never again will you wonder if students are using the correct apps during lab time.
You will have the frameworks in place that ensure your business runs smoothly and clients rave to others about how much they love your studio! It will be possible to focus on the part of lessons that only you can provide for your students: the one-on-one instruction and exploration that takes theoretical concepts back where they do best … creating music!
How do you use technology in your studios? Do you use iPads? Leave your thoughts and comments below.


Tania says:
Nothing about how to actually personalise the screens? As in, step-by-step…I found this easier with Windows but not so intuitive with Apple, even though I use my iPad a lot in ForScore, a metronome app ‘& to film students’ hand positions etc.. Instructions, please? 🙂
Rosemarie says:
If you would like help with moving apps & creating folders, I’ve created a companion article with video to help you organize your apps.
http://theunfinishedlesson.com/2018/03/26/organizing-your-ipad-creating-folders-moving-apps/
And, if you have any questions feel free to post here or email me. I will be glad to help!
Tania says:
Thank you! ?
Rosemarie says:
I’m glad it helped, Tania! Let me know if you have any further questions.